Sunday, January 17, 2016

Low Light Plant Guide for the Winter Home

During these shorter days of winter there is nothing better than to have a few houseplants around to remind us that summer and warmer temperatures are indeed just around the corner. Here's a little info to help you choose the right plants for your home.

Houseplants serve multiple purposes, not only do they hold us over until we can get outside and enjoy the lush green of our backyards once again, but they also help to de-toxify the air.


House plants are the ultimate in functional decorating. Some well-placed greenery can not only brighten a space, but also purify the air -- and they're also helpful in creating a more relaxing, restful ambiance in any room.
Top 10 most beautiful houseplants that are easy to take care of and effective at increasing oxygen and clearing out toxins for cleaner breathing air:
1. Aloe Plant
2. Ivy
3. Rubber Tree
4. Peace Lily
5. Mother-in-law tongue (Snake Plant)
6. Bamboo Palm
7. Philodendron
8. Spider Plant
9. Red-Edged Dracaena
10. Golden Pothos

Now if taking care of houseplants has never been your "thing" maybe you just haven't found the ones that can practically survive in a closet. I have several friends (I won't name any names) that have trouble with houseplants because their homes are quite dark. If this is also your issue, then here are a few plants that can survive a darker room and still offer you the benefits mentioned above:

1. Ferns
2. Mother-in-Law tongue (sansevaria)
3. Rex begonia
4. Pothos
5. ZZ plant (zamioculous Zamiifolia) 

A few words of Garden Shop wisdom...there is no such thing as having a "Black Thumb"!  You just haven't found the plants that will work in your environment yet. So stop in to The Secret Garden and we'll help you find the one that will work for you!

Jennifer, The Secret Garden


Tuesday, January 12, 2016

Got Ants? Are You Ready to Try a More Natural Approach to Control

In our home we do our best to use as few chemicals as possible. I'm not perfect by any means, but we really try. I was put to the test just before Christmas when I saw a few ants in the bathroom. Of course the next day they were in the kitchen, the pantry, the other bathroom! We were no longer talking about just a few! Wow, their timing was perfect! The holidays, loads of extra food prep happening, guests, all of it, and I was dealing with ants!

It had been a while since I'd had to deal with ants so I did a Google search and looked for DIY ant killer. There are lots of recipes for homemade all natural ant spray so I settled in to try a few. The first one I made was a combination of apple cider vinegar, baking soda and dish soap. I got the recipe here 

It killed the ants I sprayed, but more just kept coming!

Next I tried a mixture of hydrogen peroxide, mouthwash and dish soap that I found here 

It also killed the ants on contact and smelled great, but more ants just keep coming!

So I honed my search for a recipe that would work on killing the queen not just the workers you see in your pantry. That's when I came across a recipe that called for just 3 ingredients, two of which I readily had and one I had to go looking for, Sugar, Water and Borax. I found the recipe here http://www.listotic.com/everyday-products-you-can-easily-make-from-home-homemade-products/18/

Borax is a natural mineral found within the ground that has been used for years as a natural laundry booster, multipurpose cleaner, insecticide, disinfectant and more. Its chemical name is sodium borate, or sodium tetraborate and while I wouldn't be feeding it to babies, I feel better about using a mineral from the earth than I do about using a chemical compound created in a lab somewhere.

The process for using this recipe is simple. Mix sugar and warm water and borax and then soak a few cotton balls with the stuff. Leave the wet cotton balls where the ants will find it. The sugar and water will bait the ants into thinking they've hit the mother loads of free snacks, and the borax will deliver the punch, just not immediately. Here's where you have to have a little faith that the Google Guys won't steer you wrong,

So I did as I was told and soaked a few cotton balls. One in the pantry where they were thick as thieves on a bag of unsweetened coconut of all things. One in the downstairs shower where they had developed  a taste for my daughter's shampoo. And one on a window sill in the family room where I had seen a few ants.


Within 20 minutes the one in the pantry and the one in the shower where covered in ants. The message was out that dinner was served and hundreds, no thousands, had answered the call. Here's where my aforementioned faith was being tested. Was I just feeding them or would this work?

Well, here's what happened. The two that had drawn a crowd were rock hard in about 6 hours. I guess the ants were sucking it dry. So I replaced it with another treated cotton ball and they sucked that one dry. This went on for three days. By day two though I noticed a few dead ants near the cotton ball. And by day three there were a lot of dead ants. Dead ants in the kitchen too even though I didn't leave any baited cotton balls in the kitchen. Finally by day 6 the baited cotton balls weren't drawing any ants at all and I couldn't find any ants moving around anywhere. 

I'm calling this a success. It took a week to be completely rid of the little pests, but I did it without laying down toxins in my house or spraying toxins that we could all be breathing in. And I think if borax came from the earth, then our landfill won't mind a few cotton balls laced with the stuff when they finally get there.

So that's my story. How are you making changes to live cleaner, greener and safer?

Jennifer
The Secret Garden


Sunday, January 3, 2016

Feeding The Birds in Winter

I love having birds in the garden. I love the songs they sing up in the trees and I love to watch them take a bath in the fountain. I'm not really a bird watcher as a hobby, I just love their singing and their playful spirit. I also really like the fact that offer up some very natural pest management by eating aphids, spiders other bugs I may not want around.

Our garden has a fair amount of bushes and trees that do offer berries even in winter, but it's nice to offer up something extra this time of year when food is scarce. If you take the time to make sure your garden offers water and food all year then you will be able to enjoy the benefits of having birds year round.

Some people tell me that they don't want to put out seed because it germinates and creates weeds. If that's you, then try heating the seed to sterilize it. 5 minutes on high in the microwave or 30 minutes at 300 degrees in the oven should do the trick.

Last week I made some bird seed cakes to hang in the trees. I tried this recipe I found online and it was quick and easy. Then I used cookie cutters to make them fun shapes. The birds will be just as happy with some simple seed in a feeder, but I was drawn in by the cuteness factor of these cakes. Besides, you're never too old to play and smooshing sticky birdseed into heart forms is pretty fun stuff!

If you want to have a go, here's the recipe i used...

Bird Seed Cakes

4 cups wild bird seed
3/4 cup flower
1/2 cup warm/hot tap water
1 packet unflavored gelatin
3 Tbls corn syrup

In a large bowl mix the bird seed and flour until well blended. In a smaller bowl dissolve gelatin in water and add corn syrup. Pour liquid into bird seed mixture and stir well to combine. 

Spray your work surface and the insides of your cookie cutters with non stick spray. Pack the cutter with bird seed mixture, pressing down to make a dense cake. Use a straw or a kabob prong to make a hole near the top for string. You can use the same cutter over and over, just release from the cake carefully.

The cakes will need to air dry for about a week. I put them on a wire rack so they would get good air circulation. After about 4 days I got impatient and baked them for about an hour at 200 degrees. Worked like a charm! 

Next, thread with some string or colorful ribbon and they are ready for hanging outside. Have fun! 

Freshly smoothed into shapes!

Dried and strung with twine.

If you like the look but would rather a quicker solution, stop by The Secret Garden. I made lots!

Jennifer
The Secret Garden


Saturday, December 19, 2015

Gifts from the Garden


Do you grow your own herbs? My husband and I love to cook with fresh herbs whenever possible and we have a fairly extensive herb garden. We grow some at home and we grow a lot at The Secret Garden too. Even now in the winter months I can still walk outside and snip fresh herbs from my perennial beds of thyme, oregano, chives, marjoram, rosemary. The annual herbs like basil are gone from the garden now, but we've put away enough pesto to hold us over until next summer and the spice cubboard is filled with jars of dried herbs for when it's too cold and dark to go outside. 

Dried herbs, herb blends and mixes make a great quick gift for the foodie in your life. If you have herbs hanging in your pantry like me, then it's time to get blending. This year I made a wonderful dill dip mix, some spicy hot fiesta dip mix, a dry rub for chicken and pork and blended my own herb blend similar to Herbes de Provence. (We call ours Herbes d'Elk Grove!) 

  I hang herbs to dry on my pantry wall. It's not pretty, but it's dry and dark and that's perfect.


A pretty tag makes these perfect for gift giving. 

Here's a link to the site that offered some great dip mix recipes. I used both the Fiesta Dip and the Dill Dip to make ours and they are delicious. If you don't just happen to have dill hanging in your pantry :) you can purchase dried herbs at the store and still put together mixes as quick inexpensive gifts. Or better yet, head over to The Secret Garden and pick up our mixes already made!

What about plant inspired gifts from your garden? If you grow succulents, you can no doubt take a few cuttings and put together some darling little pots of happiness to share. We also scavenged in the yard and used old pieces of wood, succulents and some fun little treasures to make fun "living scenes". If you need help putting something like this together, come see us. We also have scenes ready for purchase. Let's remember that the best gifts come from the heart.

MERRY CHRISTMAS from all of us at The Secret Garden!


www.secretgarden-online.com
Www.facebook.com/secretgarden916


Friday, December 11, 2015

Succulent Winter Survival Guide

Cold Weather Care for your Succulents

So you started with an innocent purchase. One little, very cute succulent. Maybe you heard they were easy to take care of, maybe you were roped in by the lure of drought tolerance, or maybe it was just how different the little thing looked.

If you are like me, that innocent purchase has blossomed into an entire collection, a veritable forest of succulents. In the ground, in pots, perhaps even in clever little miniature gardens. Great. You love them.  But now it's cold and damp and frost is on the forecast. So what do you do to protect what started as a small purchase and has now grown to rival the national debt?
First thing is to warn the family that friends will be coming to stay for a while. Then start bringing all the little potted darlings inside. Succulents make excellent house plants and since most of them are dormant in winter, they require very little attention. Find a spot in your home where they can receive at least 3-4 hours of sunlight a day. It can be indirect light and cloudy days don't count. Since they are dormant they should not receive any fertilizer and you can get away with watering them once a month or so. Err on the side of neglect. (The perfect kind of house guests!)

Kitchen window sills make a great winter home for some of my succulent collection.

You do need to check for pests every now and again. Aphids and mealy bugs may have decided to come in to escape the cold too. (Mealy bugs are the little cottony looking bugs.) To combat either, just mix up a 3:1 ratio of rubbing alcohol and water. It can be sprayed on the plants but I find it more successful to apply it directly to the pests with a q-tip. 

So what if your succulents are too big to bring inside or are planted in the ground? Just consider that cold winter temperatures combined with water clogged soil is a combination for disaster. If you can provide the potted plants with protection from the rain they will thank you, so drag them up closer to the house to get protection under the eaves. If frost is on the forecast then be sure to cover them at night. You don't need anything fancy, just use an old sheet or tarp. Just try to rig it so the cover does not touch the leaves. The cover will need to come off during the day when the temperatures are above freezing. Repeat this labor of love until all threat of frost is past.

Jennifer
www.secretgarden-online.com
www.facebook.com/secretgarden916

Ps. Weather forecast says it will drop below freezing in Elk Grove starting early Sunday morning and run for about 4-5 days. Best to make up the guest rooms now! 😉

Wednesday, December 9, 2015

When Life Gives You Lemons...

It's that time of year when the lemon tree in the yard is beyond laden with fruit. The branches are bending with the weight of the lemons and practically scrapping the ground beneath. I look forward to this harvest every year and I like how it comes in well after most of the rest of the garden is done producing. Now I can turn my full attention to putting up the lemon harvest. And with frost on the forecast, looks like I better get busy with finishing up what's still out on the tree.

We grow everything organically, and this harvest is one of the best I've ever had. I wonder it it has something to do with the worm castings we put down this past summer?

I picked what seemed like a lot of lemons last week. After I'd been outside in the cold for a while picking lemons off the tree one by one I decided the tree needed pruning.  Made for faster work outside and a quick escape back into the warmth of the kitchen. 
 

I started with juicing. Do you know I still have the juicer I brought with me to college 35 years ago. Gosh I wish they still made appliances like they used to. I juiced and I juiced and I juiced. Fresh squeezed juice should be used within a few days, even if stored in the refrigerator. It's not pasteurized and can develope bacteria. So all this juice needed to be bagged and frozen. 

I bagged it in 1 cup amounts, I bagged it in 2 cup amounts, and I bagged up little blocks of 3Tbls amounts by using ice cube trays. These are great for throwing in a pot of food on the stove for that lemon zing I love. Good thing I have an extra freezer in the garage. I bagged 30+ cups of juice and 48 cubes.

Next I worked on the rinds to make lemon vodka. Remember I grow my lemons organically so our rinds are totally safe for infusions. I do not recommend doing this if you spray pesticides or fertilizers on your trees. 


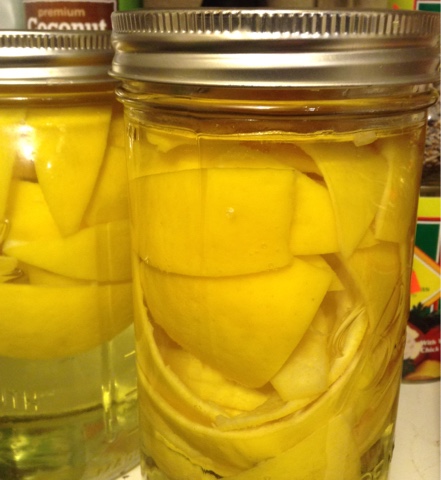
I cut the rinds into sections and removed as much of the membrane and pith as possible. Then I filled mason jars full of lemon sections and added vodka. It's that simple. You don't need to be fancy and go top shelf, but don't do bargain brand either as cheap vodka will always be cheap vodka! I used Sky for this batch. 3 weeks of infusion should do the trick. Taste after 3 weeks and see how you like it. Once the lemon flavor is strong enough for your liking, strain through cheesecloth to remove any residue. Celebrate your cleverness and make yourself a lemon drop martini! Bottle up what's left for later or if you're really nice, put some up for gifts.

If you run out of vodka before you run out of lemon rind like I did, then next you can make Lemon/Rosemary household cleaner. Another easy infusion. Just fill your mason jars with lemon rind and sprigs of fresh rosemary. The best lemon scent comes from the oils in the peels, so pack in as many rinds as you can fit in the jar. The Rosemary makes a nice partner. 2-3 weeks of infusion and it's ready to strain. I store it at full strength and then dilute with water for an excellent all purpose cleanser for counter tops, floors, stove top and more. Vinegar is an all natural anti-bacterial and I like using it better than harsh chemicals in my home. It also makes an excellent carpet and fabric stain remover when mixed with baking soda.

Still have peels? Then next you can dehydrate them in your oven. It takes an hour or two at 200 degrees and you want to make sure they are completely dry before removing. I loved how the peels turned orange as they dried. The dehydrated peels can be ground coarsely with pepper and then added to salt to make your own lemon pepper seasoning. Or grind them to a fine powder to make an excellent citric powder. The powder is very high in vitamin c and adds a citrus wallup to your morning smoothie.


So there you go. I've been at it for days and I still have half the tree to go! But it's so worth the work as I'll have home grown, fresh lemon juice for a year until the next harvest. Just imagine the lemon bars, the lemon merangue pies, the lemonade! Would you like to be able to do this too? It's never too late to plant your own lemon tree and even potted trees will produce well. Visit me at The Secret Garden if you have any questions about getting started. 
Jennifer
www.secretgarden-online.com
www.facebook.com/secretgarden916


Tuesday, February 17, 2015

You Have to Love What You Do; to Drive 200 Miles for Poo.

Today's garden shop adventure is pretty exciting stuff. Ever since the vermicompost clinic out at The Elk Grove Community Garden last summer, I've been wanting to carry this black gold in the store. (Can you now hear the Beverly Hillbilly jingle in your head?)

Last Fall I also took a 10 week course in everything to do with green gardening and once again, vermicompost was up there on the top of the list of must haves.

So that leads me to today, when Vic and I drove to Petaluma to meet up with Dave from Mass Wiggle. Dave gave us the million dollar tour of his worm composting facility. "Largest worm facility west of the Mississippi" touts Dave.The tour really was fascinating, how they take cow manure, rice hulls and tree chips and turn that into premium compost. This mixture is turned 5 times over the course of 30 days, and then it's fed to Dave's worms. Dave's 200 million worms live in specially designed 3 story condos in an old converted dairy barn! 

Another month or so of feeding the worms and harvesting their (ahem) poo and then it's on through the various conveyor belts and tumbling drums until finally out falls the most beautiful stuff I've ever seen. (Poetic license used here). The end result looks and feels like finely ground coffee. There isn't any odor and it is packed full of healthy microbes.

So we "loaded up the truck" and crawled through traffic back to Elk Grove carrying our 1100 lb load of premium, ready for your garden, vermicompost. We'll have it bagged up and ready for sale by the weekend so you can get it in your garden. Your plants and vegetables will thank you. Like I said, we love what we do, and we do it for YOU!